So, my dad has always been a bit of a pack-rat... and that makes me both LOVE finding things that others consider garbage, and also makes me a little worried about how much I love it. 😂
Anyway, M & one of his brothers picked up a bed that his brother and his wife had found on Craigslist, and while they were there, the lady offered them this old rough stool. M called me and asked and I figured I could use it either in our living room as a piano bench, in our bedroom at the end of our bed, or in the dining room at our table.
Flash forward a few months (when I finally remembered to bring it inside, and gave it some time to dry out) and I started work! First things first, a GOOD deep sanding. I used a 60 grit paper first to scrape off the moss (I'm not kidding), and then used my 150 grit paper for a more fine sanding.
Then, as usual, I stressed a little about what exactly I wanted to do from here! I got some help from my friends on instagram (you know who you are!) and decided to stain the legs a dark brown and add an upholstered top with the leaf table cloth I had gotten on clearance for $5.
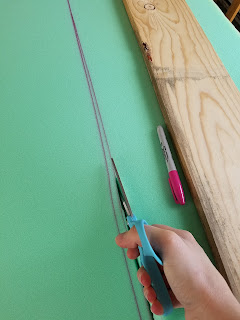
So off to Joanns we went for 2" thick upholstery foam (I think it ended up costing around $15). They will cut it down length wise, but not width wise, so I did that with my own scissors once we got home.
Next, I added in end pieces with some scrap 1x4" boards to make the whole top section uniform in shape (for covering).
Then I stained the legs. Oh gosh. I LOOOVE the color they turned out! Then I really struggled with whether or not I should still cover the top, or if I should just stain it beautiful brown and be done.... But it really wasn't comfortable to sit on as it, so I figured I should continue with my original plan!
(But let's just soak in this beautiful color for just a few moments, first.)
Ok, on to the upholstery! I laid the foam down directly on the wood, and then layered a few pieces of quilt batting that I had in my piles on top to add a bit more cush, and also to add some softness along the "face" edges of the bench. I flopped the biggest piece over the top as the last step, and then folded the sides up into 1/3rds to add more cushion along the side.
Then I pulled it snug and stapled it down to the bottom edge of the bench.
All the way around... 100000 staples later. :) I kept making sure that I was pulling it snug across the top of the bench to make sure there were no wrinkles that we'd have to see later.
The ends were a little complicated, but I just tried to keep it as tight as possible and cut away some of the bulk of the corners.
Here's a better visual of the sandwiched foam between the batting and the bench top.
All done! :)
Those legggggss! :D *dreamy eyes*
Then I got to work the next day on attaching the actual fabric itself. I used a similar process, but I pulled the fabric over and around the edge to staple it to the backside of the "face" plates.
(And shame on me, I didn't sand the bottom of the bench itself. It seemed like too much work for little reward- but now I'm annoyed that it's on my blog post. Hahaha)
Again, the ends were a little weird, but I simply cut down as much bulk as possible and pulled it back tight before stapling. I added a little hot-glue to the edges after stapling to help hold the furthest pieces down past where they were being secured by the staples.
And then it was done! Super happy with how it turned out! :)
The last thing I'll need to do is to add two quick support beams between the legs and the foot plate to add some stability. :)
Let me know if you have any questions!


