So now that our downstairs craft room is OK to be inhabited (water leaks repaired and electricity turned back on), I'm getting so excited about moving all of my craft room & office things down there to have more SPACE for my projects! Before I did that, though, I knew I wanted to give the walls and floor an upgrade! Off to pinterest I went, OF COURSE.
My criteria were:
Bright -there's only the one small window, and the lights aren't great either, so I didn't want to risk adding any dark colors on the wall that would make the space darker or seem smaller.
Colorful - Our whole house has these kind of taupe, off-white, BORING wall colors. I haven't really been motivated to take on the task of repainting them all, so since I knew I was going to repaint this room, I knew I wanted it to be a fun and pretty color that I would love.
Fun/Inspirational/Motivational - I really loved how our first "craft room" was SO bright with natural light and had bright green walls, and I wanted to mimic that same fun mood, even though I'm technically in a basement.
I saw a few fun ideas like chevron walls, diamonds, herringbone...and then I saw it. A HONEYCOMB/Hexagon wall (like this).
And I was hooked.
I knew I wanted to do one on one of the walls... but then came the big decisions: What colors to use? How big? Which wall? Who would help me....? :) It took me a few weeks of internal deliberating to finally work up the courage to just go into home depot and pick up a color and get to work.
As my Christmas present, my brother had volunteered his time to come help me paint, so once I picked out the main color (a pretty light green - in homage to my "Green Room") he came and helped me paint the 3 solid walls. :) Yay! I also did a base coat of clean fresh white on the wall I decided to use as my accent wall. Even just having all that finished made the room look so new and clean! Then the following weekend, I drafted my sister to help with the accent wall, AND my cousin was in town visiting, and offered to help as well. I felt pretty dang lucky to not be doing it by myself! :)
First things first, we had to figure out the math involved with drawing hexagons... Luckily my Aunt stuck around for this part, because otherwise we would've been hitting up our ole' friend Google.
In case you're curious, there are 360 degrees total, and we needed 6 angles, so a simple 360/6=60. Then it was a matter of finding a protractor, and remembering how to use it! 😁
We drew it out on regular cardboard, cut it with a utility knife, and then I ended up taping around the edges to give a smoother edge to work against. We double sided painters tape on the back to hold it steady while we were taping around it. :)

 ^^ We enlisted all the help we could get!

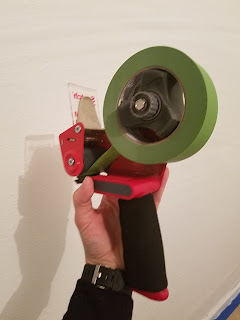
And before I show you more progress, I'll give you some tips for doing this taping off! A) A packing tape gun! My aunt had this idea, and it worked SO nicely.

 We didn't actually press it against the wall like you would with a box, but it held the "open" edge so we didn't keep losing it, and provided a quick and easily accessible cutting surface without having to mess with scissors! I definitely recommend one if you're going to try a similar tape heavy project!
We also found that less it more when you're taping the borders of the hexagons. Because each corner is a meeting of 3 different strips of tape, it's better to slightly underestimate the tape length you need than to overestimate.
We over-estimated a few times and ended up having to go back through and carefully cut & peel away all the edges with the utility knife.
Basically you just do that over and over again until you get them ALL done. Even while we were taping I hadn't decided exactly how many I wanted to do, or how I wanted it to look. So we decided to do the entire top half of the wall, and then see what it looked like and if/where we wanted to add more.


Then came the moment of truth.... dun dun duuuuuunn

My criteria were:
Bright -there's only the one small window, and the lights aren't great either, so I didn't want to risk adding any dark colors on the wall that would make the space darker or seem smaller.
Colorful - Our whole house has these kind of taupe, off-white, BORING wall colors. I haven't really been motivated to take on the task of repainting them all, so since I knew I was going to repaint this room, I knew I wanted it to be a fun and pretty color that I would love.
Fun/Inspirational/Motivational - I really loved how our first "craft room" was SO bright with natural light and had bright green walls, and I wanted to mimic that same fun mood, even though I'm technically in a basement.
I saw a few fun ideas like chevron walls, diamonds, herringbone...and then I saw it. A HONEYCOMB/Hexagon wall (like this).
And I was hooked.
I knew I wanted to do one on one of the walls... but then came the big decisions: What colors to use? How big? Which wall? Who would help me....? :) It took me a few weeks of internal deliberating to finally work up the courage to just go into home depot and pick up a color and get to work.
As my Christmas present, my brother had volunteered his time to come help me paint, so once I picked out the main color (a pretty light green - in homage to my "Green Room") he came and helped me paint the 3 solid walls. :) Yay! I also did a base coat of clean fresh white on the wall I decided to use as my accent wall. Even just having all that finished made the room look so new and clean! Then the following weekend, I drafted my sister to help with the accent wall, AND my cousin was in town visiting, and offered to help as well. I felt pretty dang lucky to not be doing it by myself! :)
First things first, we had to figure out the math involved with drawing hexagons... Luckily my Aunt stuck around for this part, because otherwise we would've been hitting up our ole' friend Google.
In case you're curious, there are 360 degrees total, and we needed 6 angles, so a simple 360/6=60. Then it was a matter of finding a protractor, and remembering how to use it! 😁
We drew it out on regular cardboard, cut it with a utility knife, and then I ended up taping around the edges to give a smoother edge to work against. We double sided painters tape on the back to hold it steady while we were taping around it. :)

Then came the fun part - sticking it to the wall and taping around. OVER AND OVER again. I haven't counted the hexagons, but maybe I will.. haha


And before I show you more progress, I'll give you some tips for doing this taping off! A) A packing tape gun! My aunt had this idea, and it worked SO nicely.


We also found that less it more when you're taping the borders of the hexagons. Because each corner is a meeting of 3 different strips of tape, it's better to slightly underestimate the tape length you need than to overestimate.
We over-estimated a few times and ended up having to go back through and carefully cut & peel away all the edges with the utility knife.
 |
| My sister having SO much fun trimming all the parts that were too long. |
Here's what I mean, in a bit more detail.
 |
| Tape your first edge |
 |
 |
| Leave some overhang on either side - but you don't want it to be longer than the width of your tape. |
 |
| Line up your next piece of tape, making sure not to pass the width of your previous piece. |
 |
| This is what NOT to do. ;) |
 |
| If your piece is a little short, you're OK to use it, as long as the tape meets where my finger is - giving your hexagon the appropriate corner at this junction. |
 |
| Keep going like this all the way around your first hexagon. |
 |
| Then when you start your subsequent hexagons, you already have at least one edge done. Line your template up so the corners of the template look pretty straight when compared to the corners of your previously taped hexagon. (Both on the sides as applicable, and up/down as applicable.) |
 |
| Then just start taping around it like you had done on the first. |
 |
| This is an example of a piece that was too long - it passed the outer edges of the tape on these two hexagons, and is encroaching on what will be the inner edge of the hexagon between/below these two. |
 |
| Use a utility knife to carefully cut along both edges to get your proper angle/edge back. |

After finishing the top half I decided I certainly did NOT want to have an entire wall full, but thought having some "dripping" down would be kind of neat! (Note: this were a little harder to keep straight, but if we had stepped back and eye-balled the placement before taping each one it wouldn't have been too bad. We didn't think to do that, so some of my "drips" are a little skewed, BUT I don't really think it messes with the look of this wall - if you're going for something super straight, just be a bit more cautious.)
Then, after we finished taping, we started painting right away.
*Sigh
This makes me sad to think about only because we didn't stop for a minute and double check that all our tape was really pressed down well - and we ended up with leakage that could have easily been avoided. Never again will I forget! lol (Learn from my mistakes!)


 |
| I started by dotting on some of the colors so my sister & cousin knew where to start painting, |
For my accent colors, I gathered up the colors I liked from my oops paint selection. (Home Depot's discounted colors). I ended up with some blues/teals/pinks/corals.
As for layout, I really just tried to go for an "organized random", so that they were pretty well spaced with natural looking gaps. I had also originally planned on painting all the hexagons in these accent colors, but decided against that when we were painting when I saw how cute it was looking, and reminded myself that "Less is more". :D
Then the last bit of painting was doing the bottom half of the wall, and the empty hexagons in the light green color to match the rest of the room. I like that they pull in the light green, but they're still surrounded by the fresh white border and all the fun colors.
 |
| All taped & painted - ready for the big reveal! |
Then came the moment of truth.... dun dun duuuuuunn
Ripping off all the tape.
Did you catch the word, ALL?
5pieces of tape x 10000 hexagons... lol - Sometimes I'd get lucky and get a cluster that would stay together, but a lot of them had to be pulled off as individual pieces, so that wasn't super fun, BUT the joy of starting to see the finished product shine from underneath the paint was well worth it!
And here it is!

Love Love Love.
I still need to figure out the best process for touching up the spots in the white that got dribbled on, but overall I'm SO happy with how it turned out!
Can't wait to craft and create in this room!
Let me know if you have any questions or need better/further explanations of any of our processes!